by tmoffett | Aug 18, 2010 | Color, Photo tips, Random images

Tanks And Trains
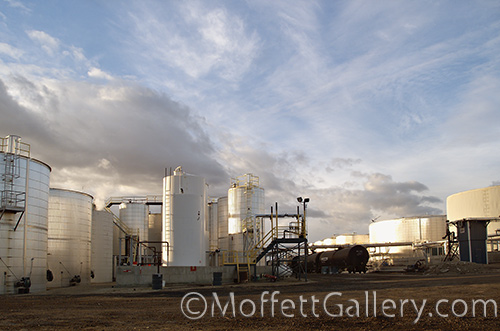
On occasion I get the chance to shoot commercial photographs for some medium to large businesses based here in Idaho. On this occasion I was photographing a large asphalt plant. How do you make a big industrial area with large storage tanks and rail cars look inviting and interesting? It is all about light.
Originally this company wanted me to shoot earlier in the day, and I insisted that to get what they really wanted I needed to be there later. They agreed to my terms and afterward were very pleased with the images. I waited until just before sunset so that the light was softer and at a lower angle, thus having the ability to create shape and form from the tanks. With the softer light, the black rail car also held detail while the lowering sun struck the sides of the white tanks creating three dimensional depth. As a bonus, we had a few light clouds in the sky to add some nice texture to an otherwise blue sky.
Remember, photography is all about the light!
by tmoffett | Aug 12, 2010 | Color, Landscape, Photo tips

Early Winter
Do you ever need to de-emphasize a busy background? I know on occasion I do. In portraiture this is an everyday situation, but a technique that is not used as frequently in landscape photography. However, it is very valuable to understand at times.
This particular scene, if shot on auto or with a point and shoot camera would be so busy that we really would not be able to tell what the main subject is. By utilizing a wide aperture (f4 in this case) the background becomes very soft, just a nice texture that visually disappears. The main subject, remaining sharp, stands out. It creates three dimensional depth. To take control in these situations, you must understand the relationship between aperture (f-stops) and shutter speeds. As you open up the aperture, the shutter speed must decrease proportionally. By doing this, your exposure remains constant and the depth of field becomes shallow, thus creating the desired effect. Most of the time in landscape photography, we are wanting just the opposite effect, small aperture and long shutter speed, giving you a much greater depth of field.
by tmoffett | Aug 10, 2010 | Color, Landscape, Photo tips

The Owyhees
I have had this image as the banner on the blog now for several months, but have never discussed it. It is one that I really enjoy, even though it is not perfect. I had just finished photographing a family at Celebration Park, which overlooks the Snake River just outside of Melba, Idaho. I was tired. It had been a long day and I just wanted to go home. However, as I drove out of the park, I saw this view of the Owyhee Mountains and had to stop. This is one of the few times that I didn’t use a tripod for a landscape image. I did, however, rest the lens against the open window frame of my car. I knew I needed a camera support, but was just too tired to get everything back out. The car did the trick. I have printed the image up to 44 inches and it is very sharp. I know that without some sort of support, though, it would have been soft and unprintable. This is one case where knowing how to get the support quickly and easily paid off.
Many of my students complain about needing to use tripods, so I try to show them different methods to accomplish the same thing. Even though there are other methods of supporting the camera, I find that most often a tripod is still the easiest method. I always carry a tripod. Even if I don’t have a camera, I have a tripod. It very rarely leaves my truck. I have just found that it is so important of a tool. When I don’t use it, I always find that I wished I had. I just cannot hold the camera as still as a tripod does.
by tmoffett | Aug 6, 2010 | Color, Photo tips

Last Light
Stormy skies can make for very dramatic photographs. They can also kill the light so that everything is flat and boring. I have learned that in order to get that perfect photograph I must sometimes fail to get any photograph. I play the waiting game quite frequently. In the case when I was out shooting this barn, I played that game and won! Just as the sun hit the horizon it popped out under the cloud cover for only a few short minutes. I was ready. My camera was set up, focused and ready to shoot. Other times, I am ready and the sun never does show up. I then quietly break down my equipment and go home, knowing that another day, when the sun does show up, I will be ready.
by tmoffett | Jul 26, 2010 | Color, Landscape, Photo tips

Sunset, Gotts Point
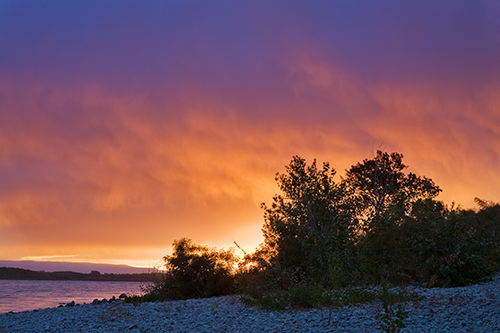
We have had some great sunsets lately, and I love being out at the lake when they happen. No matter how many sunsets I photograph, or see for that matter, I am always wanting to see more. Each one is different and unique. Photographing the sunset to capture its beauty and intensity can be somewhat difficult as well. There are a few things we can do to enhance our vision and capture an image that is more than just another sunset.
First, I want to make sure that I know what the main subject is. Is it the sunset or is it something else with the sunset as the backdrop? Nearly always I will have some other element in the image, but most of the time it is secondary to the sunset, however it is just as important as the sunset. Placement of the foreground elements must be carefully selected.
Second, shoot when the balance of light between foreground and background is ideal. Do you want a complete silhouette or do you want to see detail and color in the foreground elements? In the image above, I wanted to see detail, so I waited until the light on the rocks and trees were about 1.5-2 stops darker than the sunset, and then I made the photograph. Had I waited another 5 minutes, then the trees and rocks would have been completely black. There is very little time to work if you are looking at this kind of balance. You must be set up before the light gets where you want it. A spot meter helps in determining the light ratio and know when to shoot.
Third, use a tripod and cable release. This can not be emphasized enough. I am a firm believer in tripod use. I lock the camera mirror up and use a cable release nearly all of the time. It makes for sharper images. It forces me to slow down and think. I like to make every shot count. Editing is easier this way. I have fewer photographs, but am able to print a very high percentage of what I shoot. I like it that way.
Using these techniques will allow you to do almost everything in camera. You will have very little editing and Photoshop work to do on the image after importing to the computer. This saves a tremendous amount of time and energy as well increases final image quality.
by tmoffett | Jul 24, 2010 | Color, Composition, Landscape, Photo tips

Just a Weed
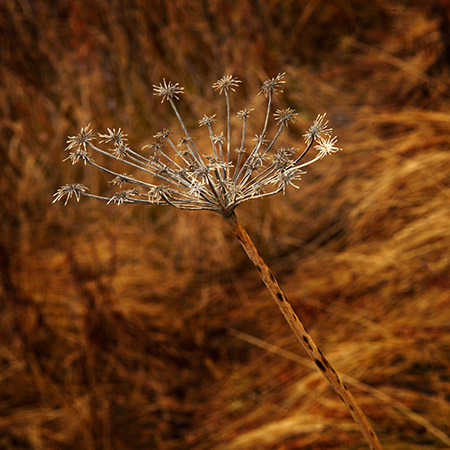
I know, it’s just the dried up remnants of a weed. I wish I knew the name of the plant so I could at least title it correctly, but I guess I didn’t study enough botany in school. Even though it is just a weed, look at the visual qualities of the image. The line and texture make it interesting to look at. The top of the plant is bursting out from the stem, almost like fireworks exploding from a mortar. By keeping the one plant sharp and blurring the background, even though both are the same color, the plant stands out, it separates from the background.
Controlling depth of field, so vital in creating photographs. I know, it is the technical stuff that many of us don’t want to get in to, but it is necessary if we are going to be in control of our art. With this image, I used a 70mm lens and moved in as close as it would focus. Due to being so close to the subject, my depth of field was very narrow, so much so that the near and far parts of the weed were out of focus, even at a moderately wide aperture. I actually needed to stop down to f16 to maintain crisp focus on the weed, but due to how close I was to it, the background fell off to a nice blur.
There are three things that factor in to effective depth of field. 1. Aperture 2. Focal length of the lens 3. Lens to subject distance. All three of these play a part in determining what will be in focus and what will not. We, as photographers must know our equipment and how to use it. In the example above, had I just thought that due to needing shallow depth of field I should set the aperture to f2.8, I would have been terribly disappointed. I am glad that I have learned the technical aspects of photography to the point of really not having to think about it so that I can focus on composing and creating art!


Recent Comments